All about block printing. I love block printing because it’s a versatile engraving technique that can adapt to beginners and professionals alike. Still, it’s also a lot of fun to do and can look great even if you’re not very experienced. Let’s dive into all things block printing, and you’ll be ready to go in no moment to get easy landscape drawing.
What is block print?
Block print is when you take a piece (wood or otherwise) and cut off parts of the surface. You’re cutting the negative space out of your design (everything around it). Then, use an ink-covered brayer (roller) to roll the color onto the surface and press the block onto a sheet of newspaper. The ink only adheres to the fields you haven’t sculpted, and this is the image printed on the form.
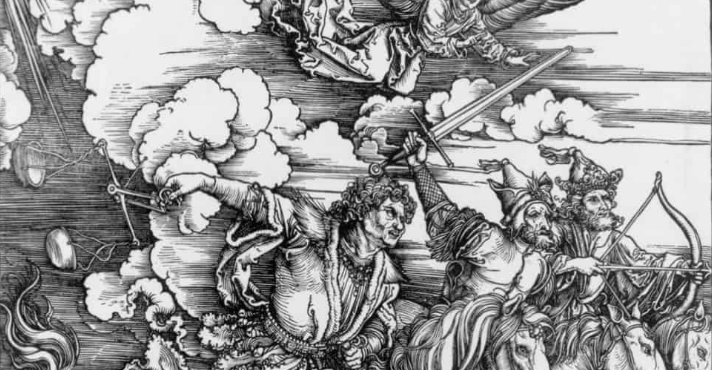
Block line is ready, as your container uses blocks of wood, linoleum, or rubber for printing and water- or oil-based inks. You can print on any surface that accepts printing, but most people stick to paper or fabric. Block printing is generally considered less detailed than other engraving techniques, based on the carving process. But! As you can see from the Durer print below, you can get quite a bit of detail with block printing too.
A short history of block printing
- Wood printing originated in China “in ancient times” (source)
- German artist Albrecht Durer revolutionized engraving (including woodcut) in the early 15th century with his exceptional talent.
- German Expressionist artists first used linoleum blocks for engraving in the early 20th century. (source)
- Matisse and Picasso spread the use of floor to get pictures in the 1900s
- Many children are taught to block printing in art classes, usually using linoleum or rubber blocks.
- Block printing refers to any print my carving made on a block of wood, linoleum, or rubber.
Block Printing Supplies
Blocks
When I started block printing, we only had linoleum blocks to carve, and I remember very vividly the excitement of using an actual carving blade and learning to cut by myself so as not to tear my finger. I learned how to tilt the linoleum block against a wooden bench hook (which hooks over the table, so you have more control over the block as you carve).
At one point, someone invented a rubber-like block printing plate, which is smoother and more accessible to carve than linoleum. I have found that most artists who are very familiar with engraving still prefer to use linoleum, while rubber blocks are preferred by people who want to use their designs more like stamps or don’t want to bother with carving.
Linoleum printing pads
- Rigid linoleum disassembled or assembled (on MDF fiber panel) to make them more resistant.
- Available in 2 × 3 ″ up to 36 × 36 ″ or Blick offers their per roll. The rolls can be cut with a knife.
- You can add your backing to the disassembled linoleum
- Linoleum is probably better for detailed work as it tends to cut a little cleaner than rubber.
- Linoleum hardens with age.
- Heating the surface with iron will soften it for easier cutting.
Rubber printing blocks
- It can be easily cut into different sizes and shapes.
- It cuts very easily without the need to heat the surface.
- It may not be that easy to cut detailed shapes unless you have super sharp tools.
- I’ve seen some cool prints carved into craft foam, so this is an option, but I’m not going to delve into it here.
Inks
Try not to destroy your apparatuses by utilizing acrylic paint wrongly! I save separate brayers for Gelli plate printing and square printing since acrylics are tough on plates and plates, however unequivocally, what you need for Gelli plate printing. I have utilized customary oil-based inks, modest stamp cushions, and water-based inks, and I like Speedball water-solvent inks for Speedball paper and texture printing and paper block printing ink for tissue.
Oil-based inks versus water
It would help if you utilized oil-put together inks concerning textures as they will stay durable in the wake of printing. However, regardless of whether you use oil or water-put together, ink for paper involves inclination. The water-dissolvable inks clean very well with cleanser and water, as the oil-based Speedball inks connected previously.
Some other oil-based inks require cleaning solvents.
Oil-based inks take longer to dry than water-based ones, which can be a good thing when engraving, so you don’t have to work that fast. The colors of oil-based inks can also look a little more saturated. Water-based inks can lightly spray with water to extend the drying time a little, but they can work if they get wet after drying. Spray the finished piece with a spray fixer to secure it.
Print surfaces
Etching paper is your best friend here. I’ve been using Rives BFK for years, and it’s my favorite, but of course, there are other good printing papers, like Stonehenge.
If you are printing on fabric, the Speedball inks I mentioned print well on cotton, polyester blends, linen, rayon, and other synthetic fibers, but not rayon.
Other tools
Good brayers are just as important as other tools. You will need a few different sizes if you are doing different-sized prints.
Choose an image
If you are a novice, I suggest taking something easy, without too many details or crazy lines. You want to get a feel for cutting and inking, and you don’t want to spend 5 hours sitting down and sculpting an intricate design if you don’t have a good idea of this technique yet. Or ignore me and do it, but take your time! Make sure you don’t simply print images from the internet or copy them from books if you plan to sell or distribute your finished prints.
Artists work hard on their new ideas, and it isn’t good karma to take their work. If you’re not using your artwork, The Graphics Fairy has fantastic free images on their site, and you can find clip art for sale on Etsy and the Creative Market.
Image transfer
There are several ways to transfer the image onto the plate, and I generally use the pencil transfer method, but the 2 you can use with laser prints or copier prints are heat transfer and acetone transfer.
Pencil Transfer:
- Start with a pencil-drawn image or use a pencil to draw on the printed image.
- Turn it over and put it look down on the build plate.
- Redraw the lines in pencil or polish them on the plate with the back of a spoon or a folder of bones. It will transfer the pencil drawing to the surface of the container.
Thermal Transfer: Use laser or copier prints, but not inkjet prints that use a different type of ink. Here is a video showing how to do this method, but essentially you will need an iron and a piece of scrap metal to transfer the image.